Showing posts with label Hailey. Show all posts

Tuesday, April 26, 2011

Chocolate Chip Pie & Easy Crust

Recently, me and my mom went to go help out a friend because she just had a baby boy. The oldest girl there (Morgan) made this yummy pie. She gave us the recipe.


Filling
1C sugar
1/2 C Flour
1/2 C butter (Melted)
1C Chocolate Chips
1/2 C Shredded Coconut
3/4C Pecans,chopped
1tsp Vanilla

*Blend Sugar, Flour, Eggs, Butter and vanilla
*Stir in Choc Chips, Pecans, and coconut
*Pour into unbaked pie shell
* Bake at 350 for 30-35 min until golden
~*~*~*~*~*~*~*~*~*~*~*~*~*~*~*~
Crust
1 1/4C Flour
1 1/4C Cold Butter

Cut flour into butter until crumbly. Press into pie pan. keep in fridge or freezer until ready to bake.

Note: I like to use a food processor to cut in butter, but a pastry cutter or forks will do nicely.


Love,

Sunday, February 27, 2011

Card Making Maiden

A little while ago, I participated in a card exchange. ( Exchanges seem to follow me wherever I go =) Here are the ones I made,


The purple one is my favorite.
I thought I would mention that my Mom is very good at this sort of thing. She is very skilled in making cards and decorating & things like that. Thanks mom, I could never have done it without you!
Love,


Sunday, February 6, 2011

Homemade Sweet Potato Chips

My family loves these! You can make these with regular potatoes too.


First, preheat the oven to 450F


Than wash and slice about 2lbs potatoes, make sure they are thin.

Coat lightly w/oil and sprinkle with seasoning of choice. (We have used sea salt, Chinese 5 spice, and....I can not remember the other one =)

Bake for 10-12 min until crisp.

Enjoy!

Sunday, December 12, 2010

Nuts, Nuts, Nuts!

The time for nut collecting has come! Our pecan tree has started bearing nuts and we, (Me Elijah and Naomi) went out in the freezing cold and collected nuts :-) Thankfully mom said we could have hot chocolate when we came in. It was actually quiet fun! We made up a game that when ever Elijah knocked the tree with the rake we all had to scramble and pick up as many nuts as possible. The rake got stuck up in the tree a couple of times but we got it down all right. A pecan has a little outer pod that falls off when it is ripe. Than there is the inner shell that you have to crack, first we were doing this with wrenches which were not working very well so mom ordered 3 nutcrackers they just arrived yesterday and we are going to use them right now...so I should get off the computer and help=)

This a Drake nutcracker, the type mom ordered, it seemed to work well. It adjusts to the size of your nut,and cracks them fast and easily.

Love,

Sunday, November 28, 2010

Tinctures

There has been a cold going around in our house and my mom decided to bust out the tinctures:-)

Here is the basic recipe:

~Fill a Pint jar 1/3 of the way full with dried herb(s) of choice
~Add just enough boiling water to cover the herbs
~Fill the rest of the way full of vegetable glycerin
~Put an old wash cloth in the bottom of your crock pot
~Put lids on the jars of herbs and put them in the crock (our crock pot fits three pint jars)
~Fill the crock pot 3/4 of the way full of boiling water
~Put the lid on and set it to the lowest setting and let it steep for 3 days
~Let cool, than strain and squeeze. Compost herbs or throw them away

Store in a cool dark place. Make sure to label them!

One of the things that is nice about using vegetable glycerin is that it gives the tincture a sweetness, which really helps if the herbs you choose are not so tasty. :-)

My signature is not working, I hope that it will again:-(
Love,
Hailey

Sunday, November 7, 2010

Quilling Fun

Quilling is the art of rolling paper and pinching at the corners into different shapes. You can do all kinds of things with quilling, like decorating cards, make name tags, decorations of all kinds. I learned about quilling from my Keepers at Home book. Here are some projects that I have done.

This was a birthday card I made for my mom.

This is a butterfly that I made. I found this idea on the website linked below. I have started a cork board in my room to pin my quilling on to have them on hand to give as gifts and to put on cards.

A couple of months ago my new friends AbbiYah and YahChanna (other Torah Keeping Maidens) came to visit our farm. I made YahChanna and AbbiYah two cards with their names on the outside and a Bible verse on the inside. I quilled some flowers around their names. It was my first quilling project and I was pleased with it.


Here is a link about quilling in case you would like to learn more.
Love,

Tuesday, September 14, 2010

It's dinner time!

This time I made:

Spaghetti w/ Meat sauce
Garlic Toast
Chocolate chip Cookies for dessert


Love,


Saturday, September 4, 2010

Bright Lights

I've started a new devotional called Bright Lights with my Mom. It was started by Sarah Mally and has lots of testimonies and good lessons, so far I like it!


One lesson I wanted to share with you is called "Developing a Strong Relationship with Your Parents". I think this is very important to us young ladies, as we get into our teen years. We never stop needing them as we learn and grow. Most teenagers think that being under their parent's authority is bad and can't wait to be on their own with no one to tell them what to do. They don't understand that they will always be under YAH's authority. Here are some ways to give your heart to your parents:

~Look for ways to honor them
~Express thankfulness
~Ask them for advice
~Do not keep secrets from them
~Trust them
~Maintain a clear conscience with them
~Look for ways to serve them
~Be available if they need you

The hardest thing for me is obeying them cheerfully, with my smile and to remember my "mam's and sirs". I need to make that a priority.

I am still learning. =-)

Love,

Hailey

Thursday, September 2, 2010

Congo Bars

As per Mrs. C's request, here is a cookie we shared with them during our visit. I really like this recipe, its delicious!

1 c raw sugar, I like to use sucanat or maple sugar.
1/2c melted butter
3 eggs
1 1/3c flour
2tsp baking powder
1tsp vanilla extract
1c nuts finely chopped (optional, my dad is not a fan of nuts so I often omit, very good without)
1 1/2c chocolate chips
dash of salt


~Combine butter w/sugar and stir
~Beat in eggs, one at a time
~Fold in flour, B. powder and salt
~Add vanilla nuts and chips, and mix
~Pour into greased 9x13 pan
~Bake at 325* for 25 minutes
~Cool and cut into squares

*Pull out sooner than later


My mom got this recipe from our friend Mrs. Good, when we lived in PA, hope you like it!


Tuesday, August 31, 2010

It's Dinnertime!

Today I am making:

chicken sausage

sauteed spinach w/garlic

pineapple chunks w/shredded coconut


Tuesday, August 24, 2010

Parmesan Potatoes

Here is the recipe you asked for Mrs. C. We hope you like it as much as us.

1/2 cup flour of choice
1T salt
1/2-3/4 cup parmesan. cheese
2 tsp lemon pepper
1-2 tsp garlic powder
1-3 tsp dr. parsley
2/3 cup butter or oil
4-5# potatoes


~Split butter in half and melt in 2 9x13 pans
~Wash and cut taters into chunks
~Mix seasonings together in large bowl or bag
~Toss wet/damp potatoes in seasonings to coat
~Lay in single layer in 9x13 pan on the butter and bake for 1 1/2 hours at 350 degrees

hope you like it:-)


Friday, August 20, 2010

Shabbat Shalom

We wanted to introduce to you my sisters; (My mom calls them our mini-maidens in training.) And share a couple Shabbat Blessings with you for your table tonight.

Shabbat Shalom,

Hailey, Naomi and Eliana

Tuesday, August 17, 2010

It's Dinner time!

Today we had:

Nachos! They were made with leftover Corn and Bean Salad and some rice and cheese on top of nacho chips. Baked at 350 degrees until they start to smell good.

Pretty simple :-)

Love,

Friday, August 13, 2010

Baked Zuccini

Here is the zuccini recipe you asked for, this works nicely with yellow squash too. We also use matza farfel or crumbs in place of the bread crumbs some times.

You will need:

abuot 4 zuccini
grated cheese
basil(dried)
oil
bread crumbs/stuffing mix

Grease a 9 x 13 or 11 x 15 with oil.
Cut fat 1'' thick rounds and lay in bottom of the pan.
Sprinkle the rest of the ingridients on top.
Bake at 350F for 30 min.+


This is really good, my Dad really liked it!


Love,


Tuesday, August 10, 2010

It's Dinner Time

Today I made:

Parmesan Potatoes

Grilled Chicken (I can take almost No credit for it,Elijah, my 10yr old brother, grilled it and it was really fantastic!)

Sauteed Spinach (I learned that it takes a lot of raw spinach when you are cooking it. It shrinks a lot! I used a whole pound)

and boy was it good!

Love,

Tuesday, August 3, 2010

It's Dinner Time!


Tonight for dinner I made:


Roasted Chicken

Salad

Baked Zucchini


I also made some raw pickles, but they take a few days to be ready.

Making Sourdough Starter


Our family would like to start using sourdough instead of using commercial yeast. So Mom put me in charge of making a starter (with her supervision). Personally, I really like sourdough. It takes a lot of time but it is worth it! We are taking the GNOWFGLINS Sourdough eCourse together to learn how to make the change to sourdough.

It is best to start this project in the morning or before bed because you will need to feed your starter every 12 hours.

In a pint jar, put 3/8 cup of wheat flour and 1/4 cup water, and mix vigorously. Cover jar loosely and let sit on the counter for 12 hours between feedings. (It is important that it be filtered because chlorine kills sourdough.)

It is best if both are at room temperature. The starter grows best between 65 and 85 degrees.
----------
First Feeding

If you don't see any activity,(bubbles) than let sit for another 12 hours. If you do, feed it 1/4 cup of water and mix well than add 3/8 cup flour and mix well. Cover loosely.
----------
Second Feeding

If you still do not see life, toss it and start from scratch. If you do, Remove half of the starter and add 1/4 cup water and stir, than add 3/8 cup flour and again stir. Cover loosely.

-----------
Third Feeding

Take out half of the starter, than add 1/4 cup water and mix, than add 3/8 cup flour and mix vigorously. Keep in mind that your feedings are every 12 hours,so you need to get into a morning/ night routine.

-------------
Fourth Feeding
Take out half of the starter, add 1/4 cup water, mix than add 3/8 cup flour and mix vigorously.-------------
Fifth, Sixth, and Seventh Feeding

Repeat above process until it consistently showing signs of life, at least one week. Well done! your starter is complete!

You may start using your starter, but it is reccomended that you keep it on the counter and feed it regularly for the next three weeks at a ratio of 1:1. (Doing this will strengthen your starter for long term use.) Afterwich time you may store in the fridge if desired, feeding it once a week.

When you want to use the starter you feed the amount of water and flour you intend to use. For example if your recipe calls for 1C of starter, you feed your started 1/2C water and 1/2 C flour and you mix it really good and let it sit a couple hours (or longer). Than you take what you need and leave the rest.

We'll show you some things we try as we go... check out GNOWFLGINS - there courses are great and you pay what you can! (And its Homeschool Science!)


Hope you have fun,

Tuesday, July 27, 2010

It's Dinnertime!

I am in charge of Tuesday night dinners in our home and sometimes it gets postponed or we end up doing leftovers or something, so please bear with me. I thought it would be fun to post my menu each week. If others would like to join me, that would be very nice. (It's OK if your Dinnertime Day is different than mine.)

I try to plan my meals a day ahead, pull out any meat from the freezer, and ask my Mom if she has any other plans for the food I want to use. Also I use things that we already have on hand. If you want any recipes just let me know and I will post them.

Here is my menu for this week:

Melon Mint Salad

Grilled Chicken Sausage

Sweet Potato Chips

Love,

Thursday, June 10, 2010

Yogurt Making Maiden

This is a recipe for nice thick plain yogurt that our friend showed us how to make. This recipe makes a little over a half gallon of yogurt. (2 Qrts and 1 cup)


Ingrediants:
1/2 Gallon of Milk (we use raw but any will do)
1C of Yogurt
Supplies:
A thick bath towel
A crock pot
2 qrt jars and 1 pint jar
A spoon
A candy thermometer
A large pot

Heat your milk in the pot on the stove over a med low heat. Be careful not to burn, this takes a little time. It is a good practice of patience. Stir regularly.

Clip your candy thermometer to the side of the pot and
heat until the milk reaches *180 degrees F.

Remove from heat and let it sit and cool until it gets down to 110 degrees F.

Stiring will help this go a little faster, but it is another test of patience. :-) (It is important to watch your tempature, because if it's too hot, it will kill the culture in the yogurt. If it gets too cold, it will not go through the proper incubation process to make more yogurt.)

In the mean time, you want to warm water in your crock pot so it is ready when your yogurt is. You want a temapture of about 110-115 degrees. 6 cups of water works well in our pot. Use the candy thermometer to check and adjust your water tempature.

Mix in 1C of yogurt* to the warm milk. Than pour into glass jars. Please ask for help with this part, the pot is still a little hot.

*It is good to use room tempature yogurt so it doesn't cool your milk like it would if it were "fridge cold". If you pulled it out of the fridge when you gathered your ingrediants, that should be fine.

Place your glass jars into a heated crockpot with a water tempature of about 110 degrees. The water should come as high as possible on the pint jar which will only be as high as the liquid in that jar.

Make sure the crock is OFF!
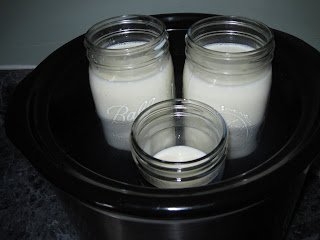

Cover the top of the (unplugged) crock with a heavy bath towel. If it is cold and drafty, you may want to use a second towel to wrap around the outside of the crock to help insulate it. My mom has also read that you can do this in a good cooler with the lid sealed tight, but we have not tried that yet.

Let sit for 12-24 hours. It will get tangier if you let it sit longer. NO PEEKING!


Save that pint jar with a cup of yogurt in it as your starter for your next batch and enjoy the 2 qrts in the next week or two. Store in the refrigerator with a lid on.

You can be a Yogurt Making Maiden too!

Love,

*We have started experimenting with lowering the cooking tempature, since it is so high. This week Hailey cooked it to 170 degrees (instead of 180) and we had a delightfully thick yogurt as usual. We are going to continue our "scientific study" to see how low we can go and keep it thick. We will keep you abreast our findings on this post, so check back if you are interested :-)

Sunday, June 6, 2010

Grama's Fruit Cobbler

This is my Grama Carol's recipe, and I make it all the time. You can use any type of fruit, frozen (no need to thaw) or fresh. Some of our favorites have been blueberry, marion berries, peach, blue berry and chocolate chip (reduce sugar!), and now...pineapple.


These are the ingrediants you will need:

1 1/2C flour (we use fresh ground flours, wheat, or spelt usally)
1T baking powder
1/2 tsp of salt
3/4C sugar (We use Rapadura/Sucanot)
6T butter
3/4C fruit, chopped or sliced
1/2C buttermilk or yogurt

Gather all your ingrediants then preheat your oven to 350 degree F.

Get a 9x13 baking dish and put the butter in it and put it in the oven to melt the butter as the oven heats up.

Meanwhile in a medium bowl combine the remaining ingrediants in a bowl, except the fruit.

Mix well with a spoon.

Using hot mitts, and carefully pull the pan out of the oven with the melted butter in it. Set it on top of the stove and carefully pour the batter into the hot baking dish over the melted butter. (do not mix) Than layer the fruit on top of the wet batter, covering the top.

Bake it for 30-45 minutes or until golden.

Its a especially good with a tall glass of milk or vanilla ice cream - but not necessary. :-)

Once you get the hang of it, you will find it only takes about 15 minutes to whip up (plus the cooking time).
Enjoy!